
All of us including guys must've heard the name of Hana Tajima right? This half Japanese and half English beauty is really an icon for all the Hijabis and no doubt, she is a trend setter who brought the hijabis fashionista wave to our country. And as far as I know, she's a close friend of Yuna. Did you hear about the Live Fashion/ Love Music held by Maysaa (Hana's fashion line) and Yuna, our own talented singer/songwriter? It was a blast (though I wasn't there)!


Okay, yess, she's indeed pretty. :)
People had been adoring her hijab styles which is unique but simple as well. So we bring you, all the videos of her tutorial back to back! Enjoy!
1. Loose casual hijab
2. Short hijab
3. Pashimina Style
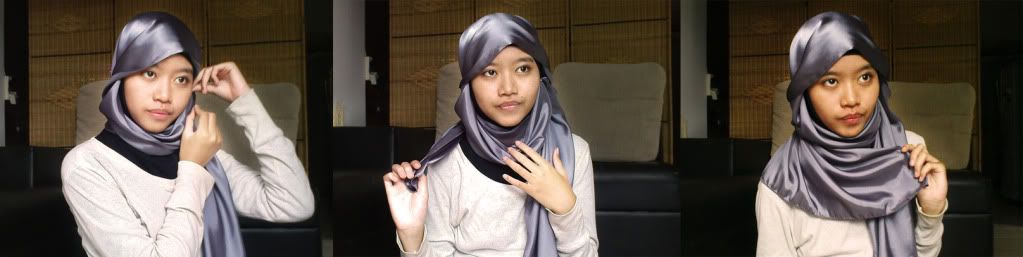
I'd been searching for Hana's new styles tutorial but to nothing. But I do find some tutorials from my friends ala Hana's style.
These tutorials are one is from my LookBook friend, Amalia Ardia Utami. Do check her lookbook and blog. :)
First up, Hana Tajima style 1

So here's goes! Click on the picture for larger view. :)
 |
| 1. Put your headband on | 2. Put your pashmina on (make sure that one side is longer than the other side) and then grab two side of the fabric | 3. Pull them backward |
 |
| 4. Lock them on the back of your neck with a pin (push through thr headband) | 5. Take the longer side | 6. Pull it below the short side and bring them backward |
 |
| 7. Pin the longer side on the headband | 8. Pull the rest of the longer side forward | 9. Make it neat |
 |
| 10. Pin it below the fold of the fabrics to make the pin invisible | 11. Put some pins on the left and right side of your head to make sure the pashmina wont run messy | 12. You're done! |
 |
| Done! |
Second tutorial! The tutorial is based on Hana's hijab style at the Blogger's Tea Party that she held.
 |
| Hana's hijab style during the tea party. |
 |
| 1. Put your square hijab on, make it one layer | 2. Pull the rest of the fabric upward and bring it forward, make sure one side is longer than the other side | 3. Pull two side of the fabric and pin it at the back of your neck, just like the first one we did. |
 |
| 4. Take the longer side of the fabric | 5. Fold it into two layer to make it not transparent | 6. Pin it at the other side of your cheek, push through your headband. (ps: pull the rest of the fabric at the back of your neck downward to make the backside longer). |
 |
| Done! |
For more info about Hana, you can visit her style blog StyleCovered, or check out her LookBook ! :)
What do you think of her style? ;)
- Azyan


love it! mmg bguslah tutorial ni..walaupn dlm gmba je tp sng btul nk ikut..hehe..:)
heheh thanks shazalina! so boleh la ikot kann lepas ni? yeyy! I'll post more videos for ya nnti okayy? ;)
-Azyan
really love the tutorial :) just wondering where did your friend buy the inner scarf which close the neck area as well? thank you.
ohh i bet she get it from indonesia since she's from there :)
thnks for the tutorial..i really like it
owh~nice tutorial...thanks for sharing :)